I’ve been pretty good about not buying any crafty items these past couple of months and trying to use what I have. This week at Michaels they were offering their 60% off coupon on regular price stickers, washi tape, and embellishments by Recollections. The location I went to didn’t have anything that I wanted, so I decided to stock up with their scrapbook paper deals instead.
As always be sure to click the highlighted links throughout this post for related posts and links to purchase items/similar styles featured.
Hello, my name is Lakia, and I am a planner addict. If you’re new to the blog you may not know that, but if you’re a frequent reader you can see that planning is what I do. It’s therapeutic for me. Yes, I find peace and happiness in putting down stickers. Hey, everyone has their ‘thing.’ Aside from that, I find myself getting a lot more done when I brain dump everything that I’m thinking on to paper.
If you interested in planning and don’t know where to start, check out my Planning for Beginners series.
As always be sure to click the highlighted links throughout this post for related posts and links to purchase items/similar styles featured.
Welcome to another haul here on the blog. I’ve shared a Michaels home decor haul from goodies I scored on MAJOR clearance. I’ve shared a collective haul from my vacation. I also shared an Etsy sticker haul and this haul is about all the planner goodies that I’ve accumulated over the past month.
As always, be sure to click the links throughout the post for related posts and links to purchase items/similar styles featured.
I’m in the process of revamping my office and I had a built in closet that I had my shoes in. As for my craft stash, everything had been on a shelf and I kept accumulating product. It was all crammed and I knew I needed to create a better system. So, I moved my shoes into my bedroom closet and I started to design my craft closet. As always, be sure to click the highlighted links throughout the post!
I had previously purchased containers from Michaels. Some the size of shoe boxes and others half the size of that. All were purchased on sale. The smaller ones retail for $7.99, I paid around $3.50. I can’t remember the price of the larger ones, but I know I purchased them on clearance as well. I took those containers and repurposed some other boxes I had to work in the space. I did not go out and purchase any product or containers for the sake of this post. This is my craft stash in one central location which will make it easier for me to complete projects in the future. Check out my previous system HERE.
Let’s start from the bottom up. The bottom stores all of my scrapbook paper and in the accordion file, I have various colors of card stock. I also have my wireless Apple keyboard which I use with my iPad and the MAMBI paper sheets which I used for my vision board along with covering my old HP computer box. My old computer box houses frame that I’d like to use for future projects. I also took an old Erin Condren box and covered it with duct tape from Dollar Tree and it has extra stationery. The MacBook Pro box is there for the time being until I find what I want to store inside of it.
The bottom shelf has extra supplies along with my tool kit. I purchased my tool kit from KMart. The bin holds extra frames and nick nacks to use for future DIYs. I also have a bin that holds gift bags and tissue paper. My favorite bin would have to be my extra storage. I save all cellophane bags from Etsy orders and other packages I’ve received. I also save the containers stickers have come in, washi tubes, and the Dollar Tree washi tape packaging. The cellophane bags have been used for storage in other containers and I also use them to create pockets in my planner dashboards.
The shelf above that is pretty empty for now as I’m still trying to figure out what I want to go there. Off to one side are extra pencils, markets, pens. Then in the bin I scored for $1.50 from Target after Easter, I have extra fabric from my DIY Ninja Turtle costume. The polk a dot box has extra stuff in it, like cords, so that’ll be moving elsewhere. Then I repurposed my converse box to store the empty cards that I have. I make cards for various occasions and this happened to be the box that fit my stash perfectly. Use what you have, don’t buy storage just to buy it. Shop your home first!
The two top shelves hold extra supplies. The first of the two hold foam and scrapbook stickers. I also have two pencil cases that I previously had on my Ikea Raskog and I separated my Sharpies from my Sharpie pens. The three drawers I had in my bedroom storing makeup I didn’t use so I moved it here. On top of that and inside I used photo boxes for further organization. On top there are two photo boxes and a tackle box from Dollar Tree to store my embellishments that I can’t wait to use in future DIYs. There’s also my paints. I only buy paint as needed and it accumulates that way. I also have spray paint from a previous project. The container in front of that has my marker I like to use on labels and glitter so that it doesn’t get everywhere.
Lastly, I have a tools box, not to be confused with my tool kit, that holds: tape, glue, a smaller paper cutter, and magnets. That box can easily be pulled out and taken to my workspace whenever I’m working on a project.
The top shelf holds my overflow of products. I love these smaller containers from Michaels. I would love to purchase another set of these, when they go back on sale, because they fit perfectly in this space. Each stack can stack up to 5, but I currently have them stacked as 3. The labels I used on these containers are a combination of chalkboard labels from Dollar Tree and Target layered with blank labels from Target. Off to the side I have my mini notebooks and photo albums. I’m not sure what I’m going to do with the photo albums just yet. As for the mini notebooks, I like to use them as on the go blog books to plan out my posts.
I love how the closet it set up. There are some changes that I’ll be making here and there as I continue to go through other sections of my house that has more craft stuff, but for now this works.
Stickers, stickers, and more stickers! In this edition of my Planning For Beginners series, we’re going to talk building you sticker stash. I’ve shared my sticker organization in previous posts, but I’ll be doing a post in this series on organization as well. In the meantime, check out my previous installments below and be sure to click all links highlighted throughout the post.
January has come and gone and I wanted to recap my planner layouts for the month. I went back to the basics this month of planning by incorporating more printables and page flags from the Target One Spot. As my Etsy stash is dwindling there are stickers that I’d like to purchase/repurchase, but I want to use what I have before doing so. Be sure to click the links to head to the original post which features links to all stickers used.
I wasn’t a fan of my January spread at all. I tried to create this winter wonderland the theme, but I just ended up oddly placing snowmen and penguins. I also tried to color coordinate my bills versus appointments and birthdays. The monthly spread is meant to be a guide for me, but if I don’t like it, I barely refer to it. Going with an all blue theme and trying to stay true to that really threw me off.
Tip: Find a specific use for your monthly spread whether it’s to mark bills/appointments or as a blogging tool. Don’t try to cram everything in the boxes. Make use of your sidebar!
For this spread I used a combination of printables from ThreeCheers+Co, MyPlannerEnvy, and NinjaMomDesigns. this was my first time doing an all out spread featuring printables and I love how it turned out. The only thing I would’ve like to have done differently was fill out the bottom more instead of having so much empty space. I did for two days out of the second half, but that’s one thing I worked on the remainder of the month.
Tip: In using printables, don’t be afraid to mix and match various ones. Also take your time cutting them out.
This week was basic and a great example of inexpensive planning for beginners. I used scrapbook paper n the middle, left over page flags that I had from various Etsy shops and everything else was basically a Target page flags. I used them to mark my blog posts and TV shows plus my ‘To Do’ headers. I loved this spread because of the simplicity and how easy it was to achieve. I didn’t need to washi the bottom and subconsciously the scrapbook paper matched. This layout I was able to pull in multiple colors that complimented each other so well.
Tip: Experiment with what you have. Do not continuously buy to keep up with other planners. Grow your stash according to your personal budget.
This was a super cute, pre-Valententine’s day spread. This was the first spread that I played around with washi simply by cutting the ends. I also used another MyPlannerEnvy printable for the ‘To Do’ lists. I wouldn’t mind having those printed on regular paper opposed to glossy paper. The only thing I’d swap out is the bottom washi for a different alternative.
Tip: Try picking a color for a specific spread and experimenting with all shades.
I planned an owl theme in my head for this spread, but it’s my least favorite of the month. Maybe adding Olaf to mark the blizzard wasn’t a cute idea after all. The entire bottom half is crooked. I filled the white space with washi that I forgot I had purchased. Looking closer at this layout Olaf really does throw it off, but the crooked glued on instagrams don’t help either.
Tip: Don’t overthink your theme. Let it flow and add accordingly as the week progresses.
This layout is definitely my favorite of the month. I love it because it’s bright and another theme that semi works as another pre-Valentine’s day theme. It was bright and vibrant and was great to look at throughout the week. Being that there was a lot of snow on the ground, it was great to look at my planner and stay motivated throughout the week.
Tip: Have fun with your spread and don’t limit yourself to a specific season. Keep it bright for motivation. There’s nothing like checking something off your to-do list.
My initial sticker storageconsisted of a lot of loose stickers in pencil cases and accordion folders, but now they’re more consolidated. AS a planner, your stickers need to be easy to get to and with the previous way I stored my stickers, they were not.
Let’s start with my storage. I use:
1 large binder (Etsy stickers)
1 mini binder (stickers purchased from Michaels, AC Moore, Hobby Lobby, etc.)
2 disc bound books
post-it pockets
photo pockets
In my previous system I used the photo keeper to hold my Etsy stickers, but then I switched to an accordion system. I had those stickers separated by shop before separating them by type. The worse thing about planning is to get stressed over it. The key to a successful sticker storage is to be able to get to your stickers as easily as possible.
With my new system I have been able to consolidate all of my stickers and I can grab them with ease. To create my Etsy binder I cut white file folders in half and hot glued the stickers on to the folders. They’re kind of sorta organized by page flags/checklists, half boxes, icons, and football. My favorite page would have to be my “sampler” page which I glued all my loose stickers and any sampler sheet I’ve received. Check out the Etsy stores I frequently use:
Then with the mini binder I separated all my stickers in sheet protectors from Erin Condren to Heidi Swapp to further break downs for holidays and seasons. I plan to buy another mini binder to separate my seasonal stickers. My current mini binder is jammed pack, so separating the seasonal stickers will definitely slim it down.
My $1 sticker books from Micahels (Darice/Creatology) I store in my disc bound system. You can find more details on how I set that up HERE. The rest of my stickers I don’t use as much so that’s why they’re in the post-it pockets and photo pockets.
Check out my detailed video below and be sure to click the links above. Enjoy!
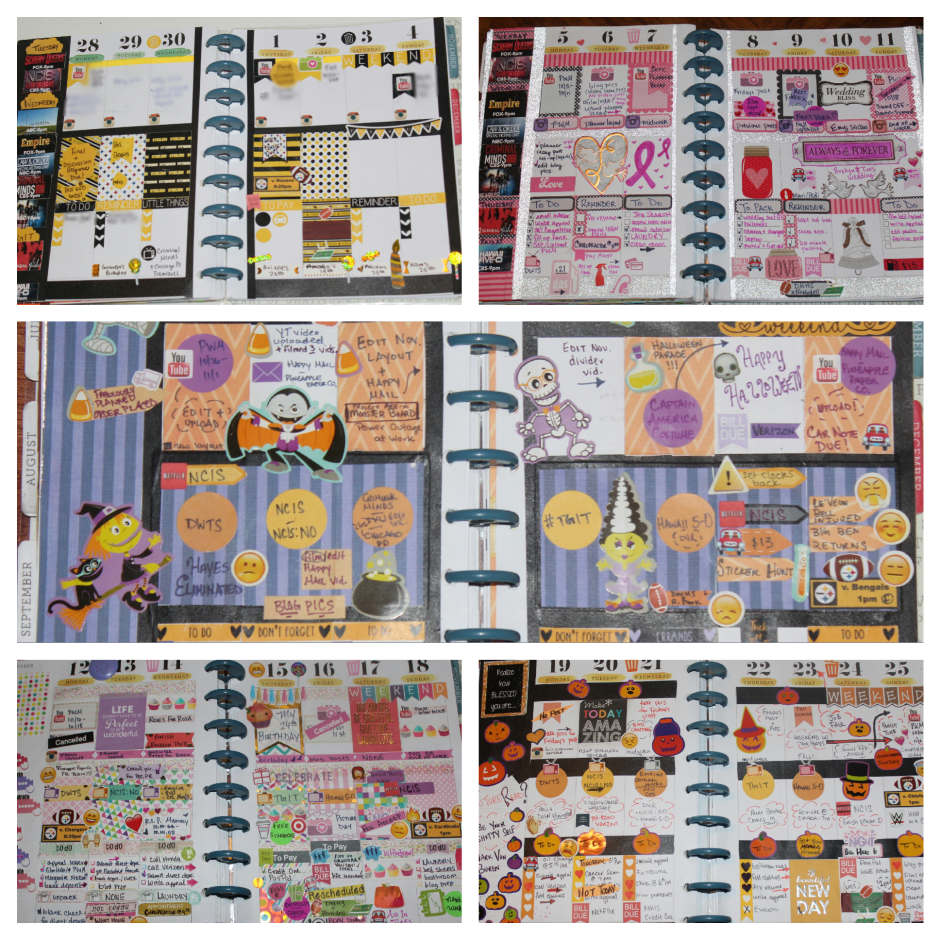
Another month has come and gone and my favorite month of the year is officially over. I wanted to share my planner layouts of October, similar to how i did in September. As I mentioned in my September post, I got this idea from YouTubers MandaPhenom andPrettyNeatLiving as they both recap their spreads. PrettyNeatLiving does it more so on a monthly basis while MandaPhenom has done it weekly. You can see my September recap HERE.
October Layout
I really was hoping that my October layout would have turned out better than it did since October is my birthday month. I used the ‘Spooky Pumpkin’ Darice sticker book along with a sticker set that I had purchased from Hobby Lobby. I honestly didn’t look much at my layout for the month of October. I didn’t fill in the amounts of my bills until I did my November layout. Not my favorite, but it wasn’t a complete mess. In the future, I will be putting scrapbook paper in the sidebars and limiting the stickers to fill in the white space. Some are just a bit too much at times.
I didn’t show this first half of this week in my September recap which I meant to do, but here’s for the second half of the week (10/1-10/4). This was my Steelers spread and it honestly didn’t turn out how I wanted it to. I didn’t really like my placement of stickers. I didn’t really use this week like I wanted to. It compared nothing to my football themed week (September 7th-13th). I really wasn’t a fan of this one at all. Layering the stickers was difficult because when I went to move them I really couldn’t because the full box sticker would be ruined. Not my favorite week. I still have a lot of steelers stickers and scrapbook paper so I’ll be trying again eventually.
This layout was meant to be for my cousins wedding, but it turned out being more pink than anything. This was the second week that I put my TV stickers in the sidebar and I used a kit from ImagineThatByLori. I really do like how this turned out although I would have preferred different wedding stickers. I had enough space to write and everything just really came together nicely. The silver washi tape really added glam and kept it with the wedding “silver” theme I was going for.
This by far has to be my favorite layout of the month. It actually ranks as one of my top layouts overall. My birthday was October 15th and I went all out for this layout. I used full boxes in the middle section. For this week I started to write my TV shows in than to use the sidebar. I also wanted to track how much water I was using so I put that in the sidebar instead. I will say that having all the stickers really packed up my weekend and it was a bit of an overload. I didn’t have much space to write and I ended up cramming things in. I have to still find that balance of filling things in versus overpacking and having no room. Then again, some weeks are more busy than others.
I’ve mentioned before in previous layouts that I enjoy using the Darice sticker books. i had purchased 3 that were Halloween themed and I dedicated an entire spread to the ‘Spooky Pumpkin’ sticker book. When I first created the layout I hated it. I hated the sidebar, I hated how empty and bland it looked. As the week went on it grew on me as I added more stickers to the sidebars and create bubbles to annotate what happened throughout the week. I wasn’t too crazy about the Erin Condren quote stickers that I added, but looking back at the layout while it’s not my favorite, I was able to salvage it. I also used my planner a lot throughout this week as a way to perfect it. I also see that I make huge to-do lists for Sunday yet noting really gets checked off. Welp, that’s something I need to work on.
This layout was one of those weeks where while I loved the layout, I was so busy doing other things that I barely looked at my planner. I love how this layout turned out as it was really based on 3 things: scrapbook paper, printables, and a $1 Darice sticker book. For those getting into planning and do not have any Etsy stickers use what you can find around you. There’s a lot of great printables especially from Wendaful and Vintage Glam Studio. You can also join Facebook groups where people share printables as well. The scrapbook paper is cheap and you can get at any scrapbook store. I used textured scrapbook paper because that was what I had on hand. Simple scrapbook paper will do and you can cut them to fit the boxes. I didn’t do exact measurements for mine, I eyeballed it.
I will say that with the printables that I’m not a huge fan of the rounded corner half boxes. If they’re already cut fine, but as far as me cutting them, I’m not a fan, I had to get creative with my half boxes so I ended up making out of left over scrapbook paper. Keep the scraps, they come in handy!
So sad to see October go, but I’m in full Christmas mode. Expect to see more holiday themed layouts. Check out what I’ve posted for November so far below:
In this plan with me I went for a fall theme. I typically like to pull out my stickers before I start planning. Here’s my full layout from last week. I went with a school theme. I wanted into be “back to school,” but I think it turned out pretty good. That layout was centered around the “Back To School” set from TheHappyDoodle on Etsy. Also, the planner I use is the Me & My Big Ideas Happy Planner which you can purchase HERE.
When it comes to planning, the longest part of the process for me would definitely be laying out the washi.The hard part is really making sure it gets cut evenly on the ends. I was thinking of initially creating a Fall TV premiere spread, but I really like how this one turned out. I used a combination of Etsy stickers and stickers from Target and Hobby Lobby. The spread centered around a set from ImagineThatByLori on Etsy. Click the links below to purchase stickers featured.
Creating this spread took me quite a bit of time because although I had everything laid out, I still had to grab things here and there. The washi which I purchased from AC Moore and Tuesday Morning is not as sticky as I’d like it to be so I’ve had to have glue on hand to make sure everything sticks. Check out my latest planner posts below and enjoy my PLANDEMONIUM playlist as well.
My name is Lakia and I have a planner obsession. Did I really need to buy anymore stickers? Of course not. But hell, since I did, I might as well share. I haven’t done an Etsy haul in quite some time, but I wanted to share orders that I have placed over the past few months along with goodies from Target, Michaels, and more.
Let’s start with the items that I purchased from AC Moore. I went in specifically for wedding stickers since I’ll be attending one in October. I found not only the stickers, but the holiday washi tape set as well. The washi tape set features 13 rolls for $12.99 and with a 50% off coupon, the price was brought down to $6.50. Compared to the similar set that is sold in Michaels, the one at AC Moore is $7 cheaper. Since I had a $10 rewards gift certificate I was able to get all three items for free. SCORE!
As for my semi-recent Etsy orders, I’ve ordered from:
Out of the four, my favorite quality of stickers would have to be Pixels and Poppies, but I’m upset that in moving the stickers that my pages were stained. I’m more upset with the shipping time being that with both orders I’ve placed the span of two months took nearly a month each to receive. No the order wasn’t coming from overseas either. I’m still waiting on order number two. I like the LillieHenry stickers, well I’m more so obsessed with the football set, but I don’t see the huge hype around them. As for TheHappyDoodle the stickers are super cute and ImagineThatByLori is by far my fav, by default, simply because of the Steelers schedule. Links to stickers available are under the pictures.
“Steelers Theme” “Colts Theme” “Superhero Theme”TheHappyDoodle “Back to School Edition” TheHappyDoodle “Mini Baking” TheHappyDoodle “Ombre Rainbow Checklist”LillieHenry “Task Box Blank Title Boxes” LillieHenry “Superbowl Sunday FUN-ctional Stickers”ImagineThatByLori “October Kit” ImagineThatByLori “Pink Planner Stickers Full Sheet” “Steelers Schedule” NO LONGER AVAILABLE
I don’t purchase many printables since I don’t have a sticker maker. I’m still debating on whether I want to take that plunge and buy one, but that’s another topic for another day. As for now, I don’t mind buying the ones that are in blocks, a full sheet. Fine by me. Plus, the ones from MelissaBeeDesigns are only $2.
Moving on to Michaels, I couldn’t help but hunt down the Christmas Darice sticker books. The first Michaels I went to was a flop and all I purchased were stickers on sale. I then went back across town and hit the jackpot at the Michaels I should’ve went to in the first place. I purchased 9, yes 9 Christmas sticker books. If the fall ones were there I probably would’ve snagged all of those two. Expect a lot of planner layouts featuring these. I really try my best to go into Target and buy nothing. Yes, nothing from Target. Then there’s the Dollar Spot, that seems to have more $3 these days, calling my name. I browsed and I only bought 4 things so that’s a plus. I picked up an accordion folder for more Etsy stickers plus some fall related stickers which I really had none of. As for the sticky notes. I mean, I have enough, but these are functional not just decorative. Excuses, excuses.
Lastly, I wanted to share my TV show sheet with you all. There are a lot of shows coming up and instead of buying TV show stickers, although the ones from FasyShop on Etsy are AMAZING, I decided to make my own. I didn’t make one for every single TV show I watch and I only made them for half the season since I ran out of sticker paper, but I like how they turned out. It was super simple to do and really took me no time at all. Download HERE if you’re interested.
Cheers to you if you made it through this post! Be sure to click the links & hope you enjoyed the haul!


